Bulk operations are a common UI pattern. I think there are a lot of tricks we can learn from building something like this. It's one of those UIs that we can build 80% of it relatively quickly, but the other 20% might take way more time than the rest. We can get most of it implemented with just HTML. However, to nail the UX and accessibility, we need JavaScript, but not as much as you may think.
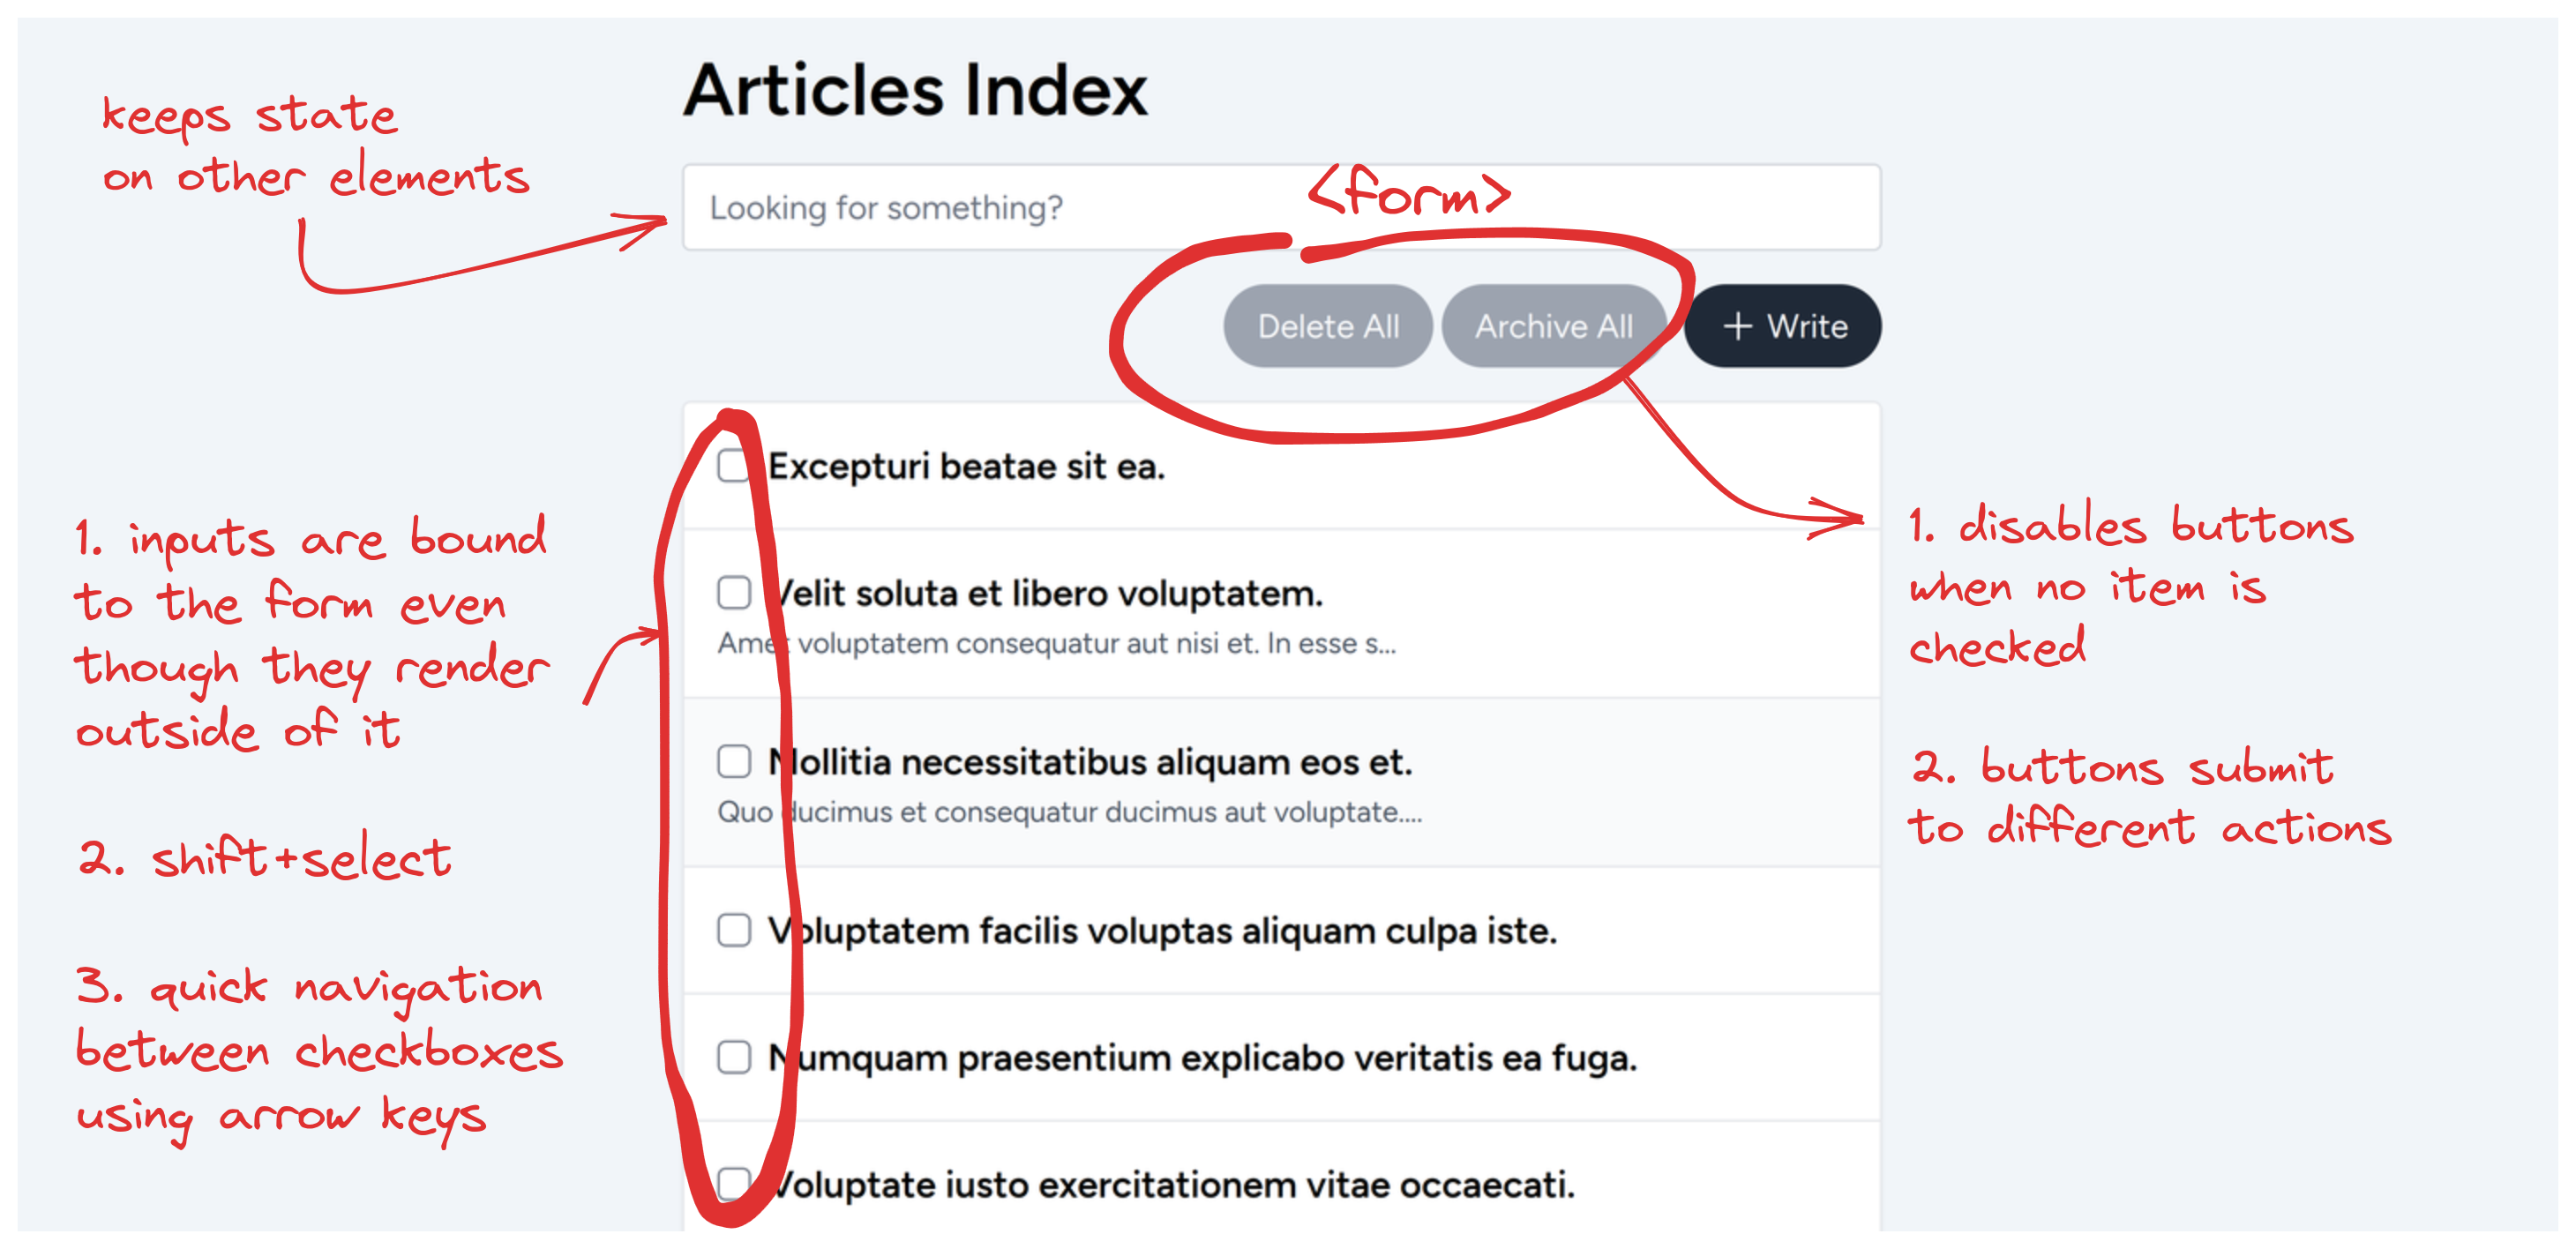
Here's the UI we're going to build:
Here's the list of features we're gonna build:
The inputs need to be connected to the form even though they render outside of it
The submit buttons must be disabled when we have no inputs checked
The submit buttons must be able to submit the form to different actions
Keep state on other things on the same page (like a search input) when performing the bulk operations
Users can use a shift+select UX pattern to select all inputs between the previously and currently checked inputs
Allow a quick navigation between the checkbox inputs using up and down arrow keys when focused on them
This is not a "complete" list of features needed for this kind of UI. But it's enough for this tutorial. We'll have two bulk operations endpoints in this example. One for the "Delete All" operation and one for the "Archive All" operation. Since our goal is only to make sure we're able to submit to different operations, we're going to have two different routes that point to the same controller and action:
We're validating that the form will send an array of article IDs in an input named `ids`, and then we're using `findMany` so it always returns a collection of articles no matter if one or many articles are given. Next, we're iterating over them and calling `->delete()` on each model.
The next bit is doing some content negotiation, and if the request was made using Turbo, we will return a list of Turbo Streams. We'll return one "remove" Turbo Stream for each deleted article (that's what the map is doing) and one more to show a flash notification to the user. If the request wasn't made by Turbo (which means the user has JavaScript disabled for some reason - which can be true for many different reasons, from them simply disabling JS to a runtime error in our JavaScript code that broke the scripts in our page, to a CDN being down, and so on), in that case, we're redirecting them back to where they came from with the status message.
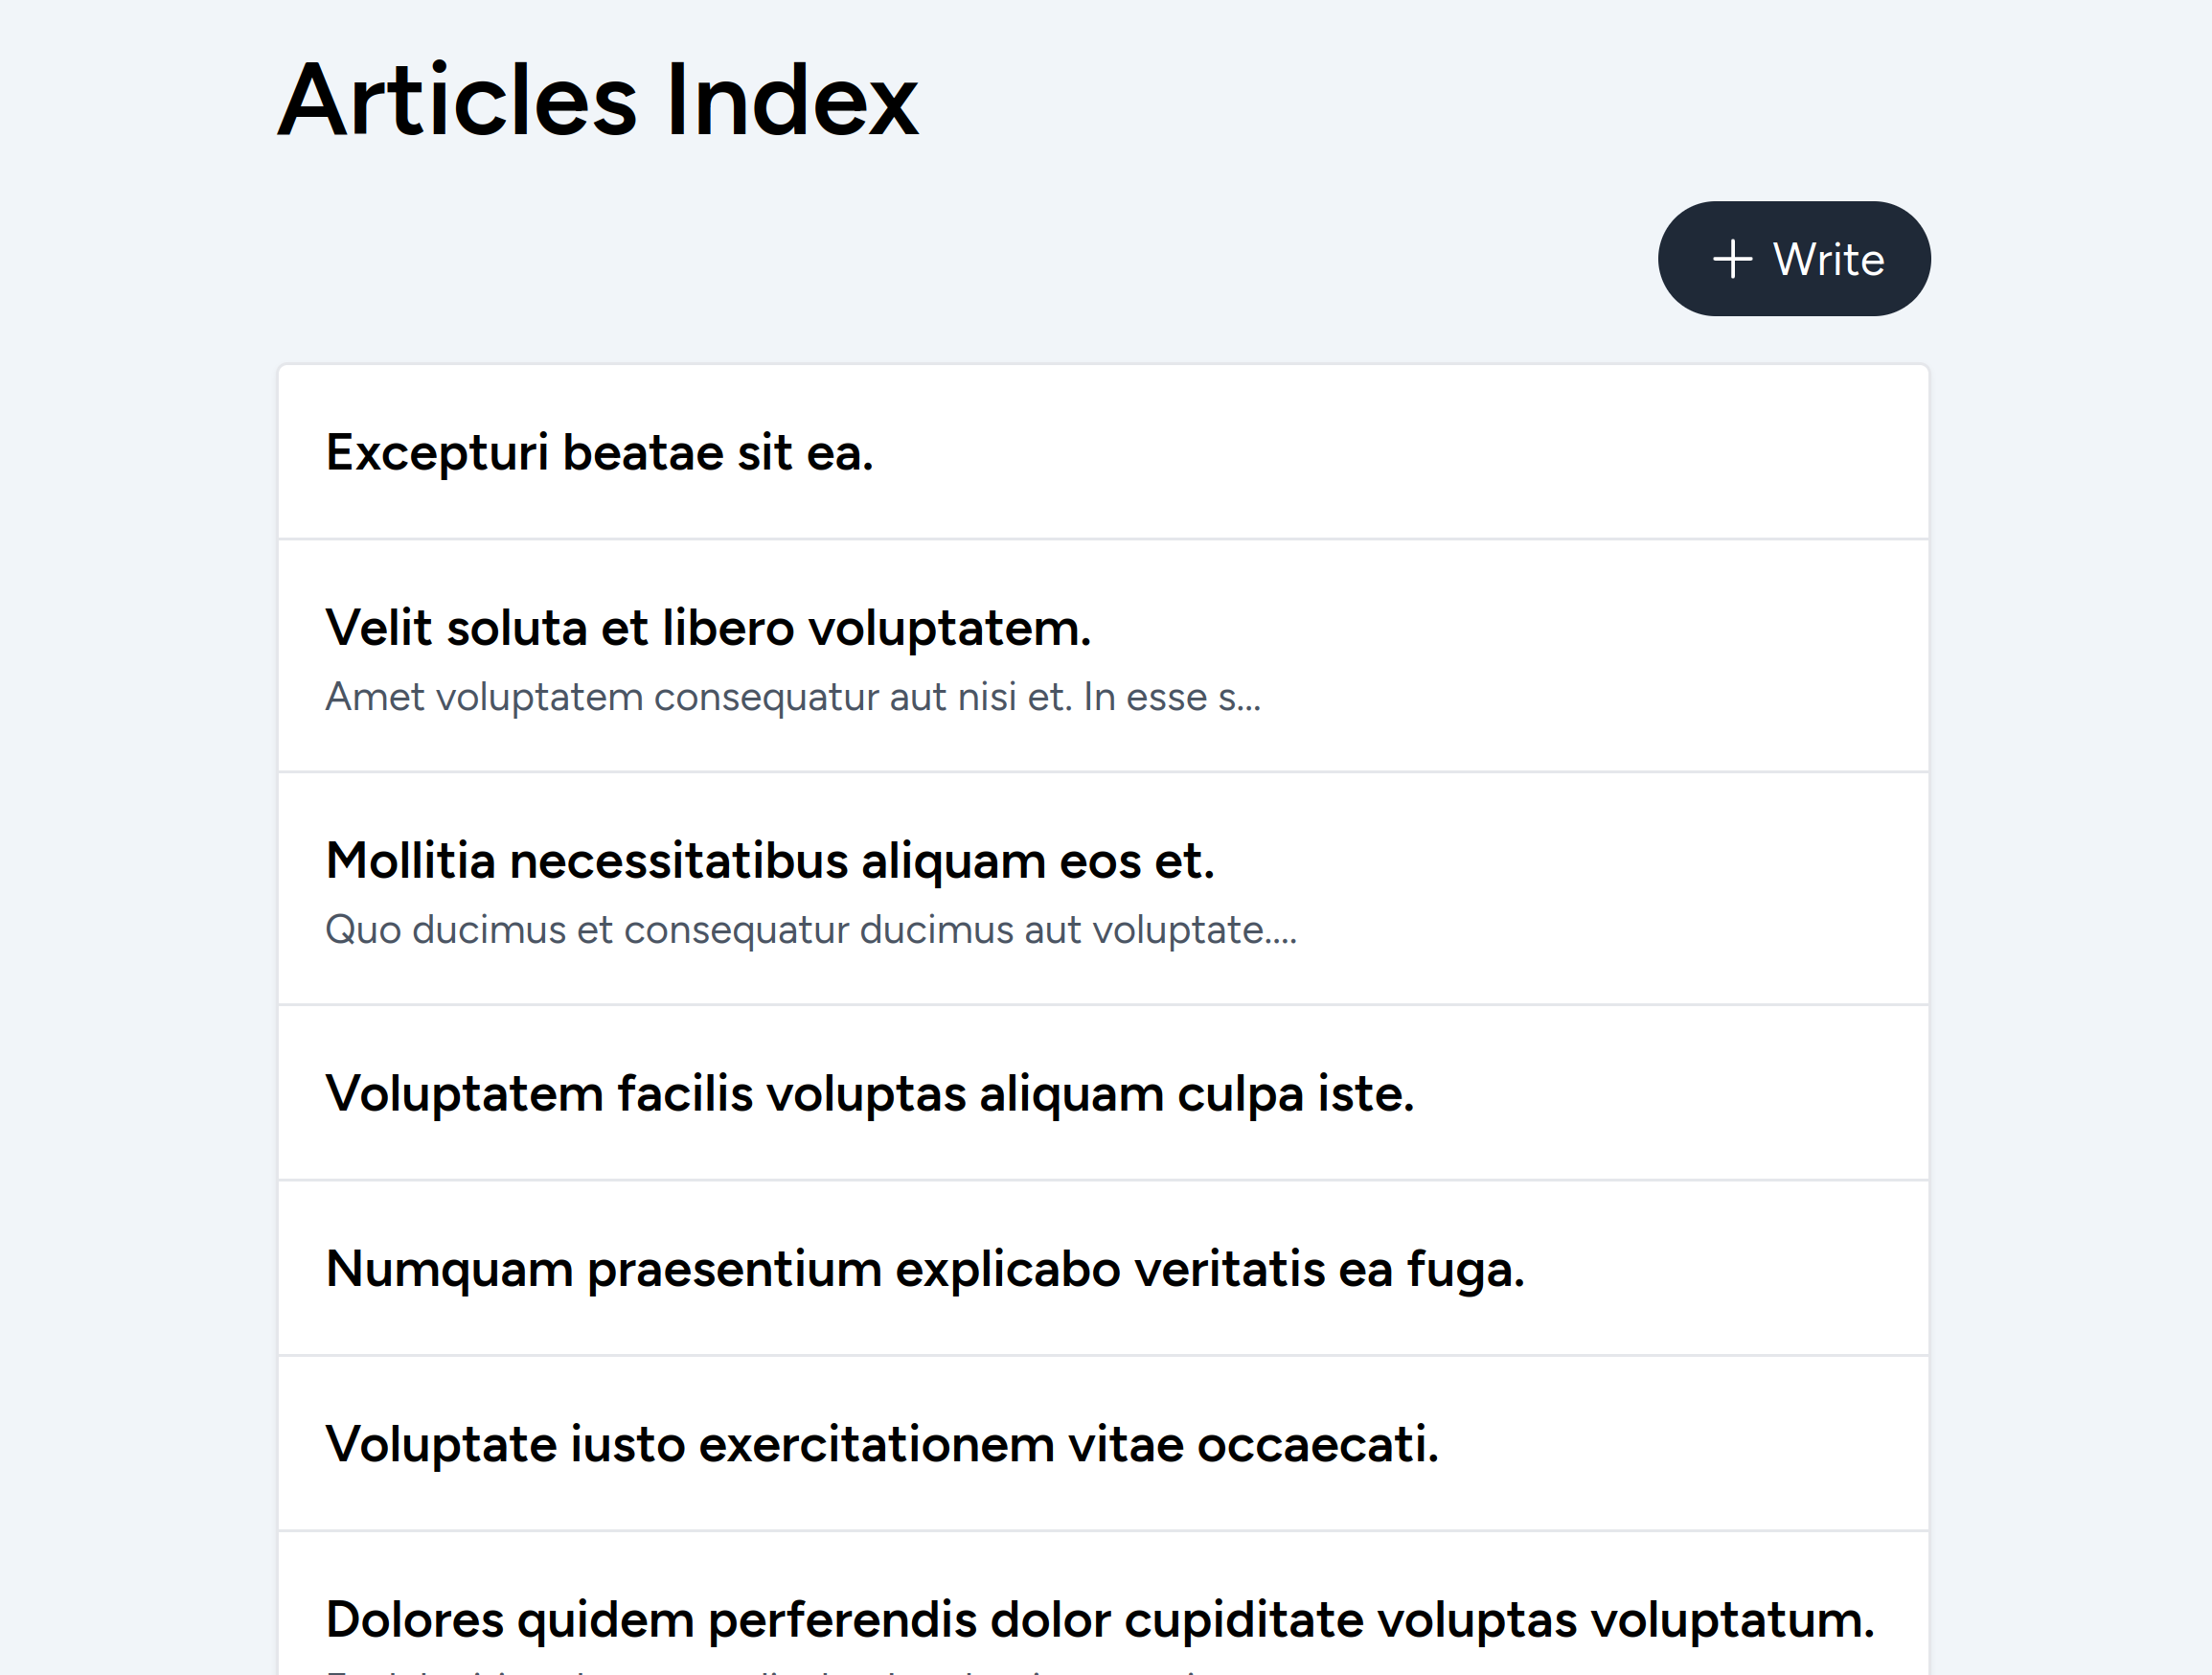
Let's start from nothing, though. We only have a list of articles. Here's what our UI looks like:
Our `articles.index` view will look something like this:
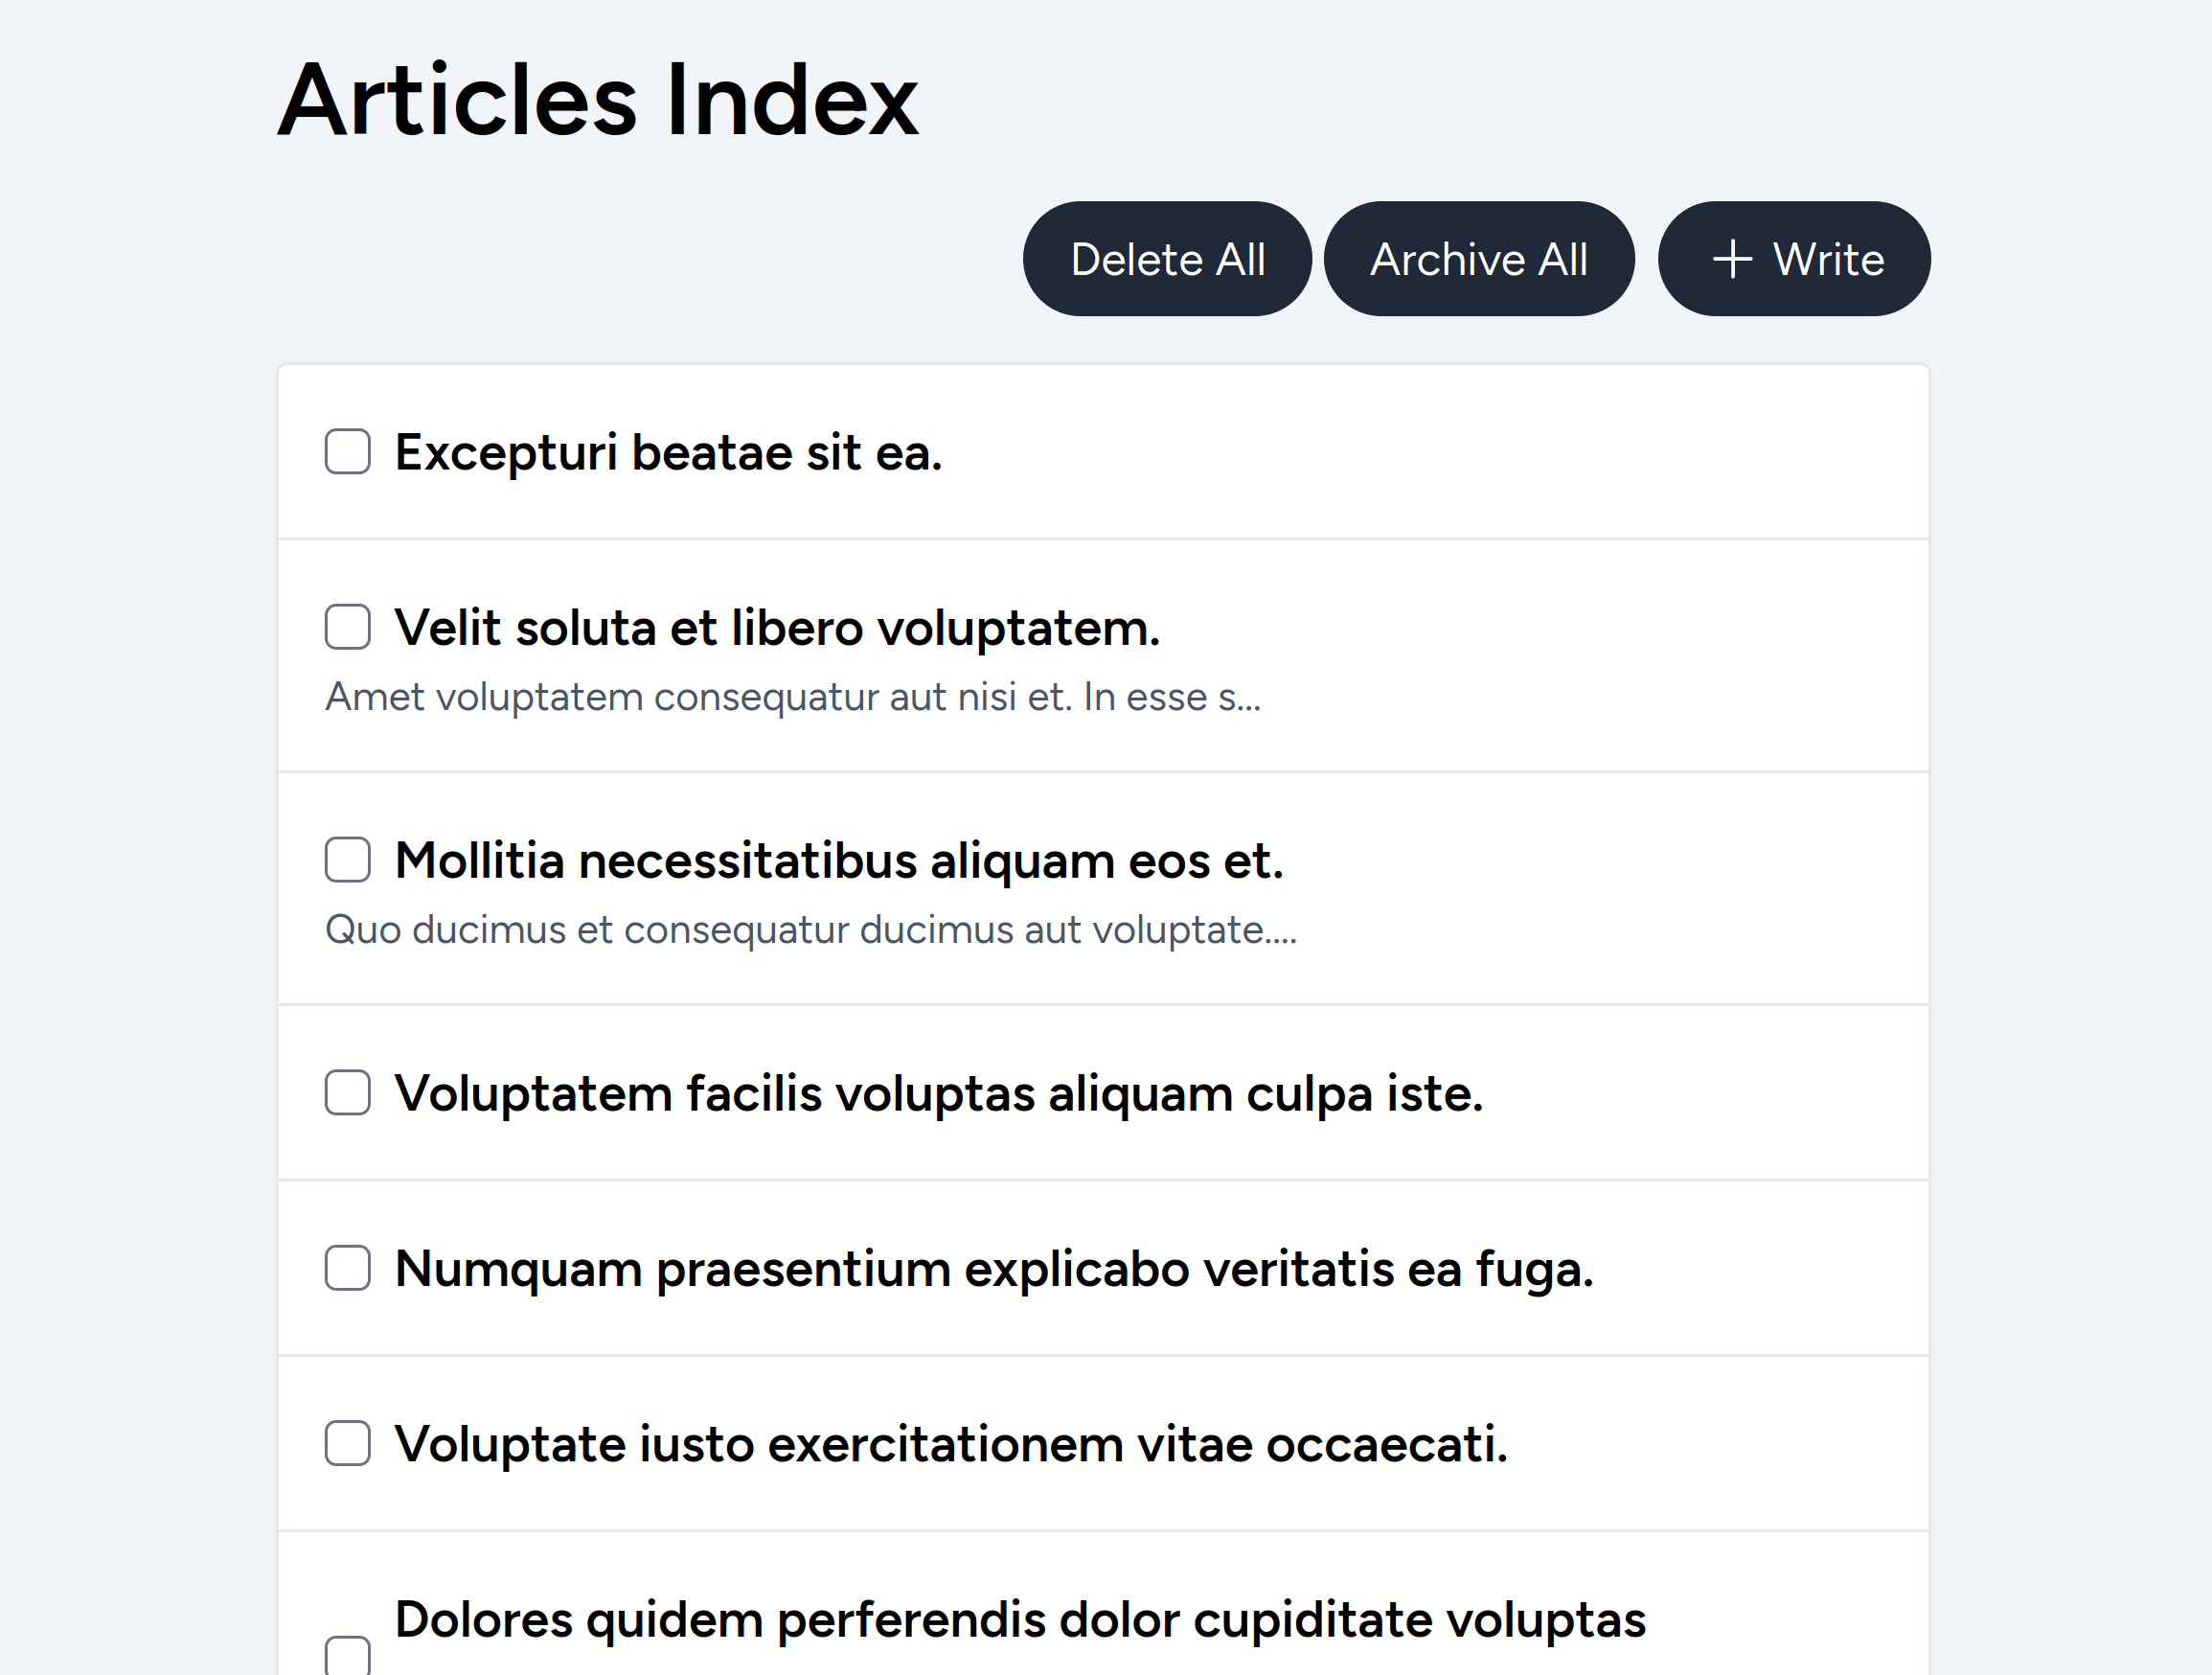
We need to add a checkbox next to each card title and hook that up with a form submitted to the bulk operations endpoints. The easiest way to implement something like that is to surround everything in a form. I don't like this approach, but let's start with that. Our `articles.index` view will look like this after our changes:
<x-app-layout><x-slotname="title">{{ __('Articles') }}</x-slot><h1class="...">
{{ __('Articles Index') }}
</h1><!-- The form is surrounding everything --><formaction="{{ route('articles.destroy_bulk') }}"method="post">
@csrf
<divclass="..."><!-- The submit buttons for the bulk form --><x-buttontype="submit">
{{ __('Delete All') }}
</x-button><x-buttontype="submit">
{{ __('Archive All') }}
</x-button><x-button-linkdata-controller="modal-trigger hotkeys"data-hotkeys-shortcut-value="w"data-modal-trigger-modal-outlet="#create-article-modal"data-action="modal-trigger#toggle"href="{{ route('articles.create') }}"data-turbo-frame="create_article"icon="plus">{{ __('Write') }}</x-button-link></div><divid="articles"class="...">
@include('articles._empty_card')
@each('articles._article_card', $articles, 'article')
</div></form><x-modalid="create-article-modal"min-height="min-h-[30vh]"><x-turbo-frameclass="..."id="create_article"loading="lazy"><pclass="...">{{ __('Loading...') }}</p></x-turbo-frame></x-modal></x-app-layout>
Then, we can add our checkbox inputs next to the titles in our `articles._article_card` partial:
If we check some of those checkbox inputs and submit the bulk form, the articles will be removed, and we get a nice-looking flash message on the screen. Nice!
However, our submit buttons are not submitting to different routes yet. Luckily, handling that is easy and can be done with plain HTML. A submit button can have attributes that will override the form. We want the "Archive All" button to submit to the `articles.archive_bulk` route instead of the default one. To achieve that, we can use the [formaction] attribute. Our button will look like this:
If you open the Network tab in your browser's Developer Tools and try it, you should see the form is submitted to different routes depending on which submit button you use. Neat, right?
However, as I mentioned earlier, I don't particularly like this approach. Even though it works fine for this example, we may have some forms inside the article card. That means we'd have forms inside forms, and that's not valid in HTML. We can work around that issue using our inputs' [form] attribute (and other form controls).
Let's move the form tag so it only wraps the submit buttons. Our `articles.index` view will look something like this:
Notice that our form has an `[id]` attribute now. We only need to add the `[form]` attribute to our checkbox input element, so here's the new version of that input:
Again, the value of the `form` attribute on the input must be the same as the `id` attribute of the form. And that's all the changes we need to do. Now, our card could have its forms since we no longer have the bulk operations form surrounding the entire view.
Simplifying Our Controller
You might have noticed earlier that we're returning Turbo Streams from our bulk operations controller. That's not necessary. I only had it there to demonstrate that we may reach for Turbo Streams too early, but we often don't have to. If we remove the Turbo Streams, our controller will redirect the user back to the page they submitted the form, which is the `articles.index` route. You'll notice that our application will work just fine. Mostly. Here's our simplified controller:
Our application works almost the same, except with a redirect now. We're making an extra request after the form is submitted to fetch the newer version of our articles index page. This works for our example, but it could cause an unexpected bug in a real application. Before, the Turbo Streams updated multiple UI parts without touching on other elements. Now, we're updating the entire body of our document. That's not ideal.
If we had other inputs with state on the page, those would be cleared out. We can demonstrate that with a fake search field ("fake" because we won't implement the search feature). Add a text input to the `articles.index` view next to the `<h1>` tag, for instance. Fill it with some text, check some articles, and submit the bulk form. You'll notice that the search input is now cleared. That's not cool.
However, we can mitigate that entirely on the client side using a Turbo Frame. Let's turn our articles wrapping div of id "articles" into a Turbo Frame. Then, we can tell Turbo that our bulk operation form is part of that Turbo Frame using the `[data-turbo-frame]` attribute, even though the form renders outside of the Turbo Frame in the document (similar to how our `[form]` attribute in the checkbox inputs works). For the sake of brevity, here's just our Turbo Frame and form:
Now, whenever we submit the bulk operations form, only the list of articles will be updated! Our search input state will stay untouched. Notice that we lost the status message, even though we're adding that to the redirect in our controller action. If you inspect the response HTML for the redirected request after our bulk operations form submission, you'll see the status message. However, since we're using a Turbo Frame, only the contents of the matching Turbo Frame are updated in the current document. Everything else is discarded. We can fix this by rendering a backup flash message Turbo Stream inside our articles Turbo Frame:
As you may have noticed, a Turbo Stream is another custom HTML tag. If you append it to the document, it will apply itself using the action and targets defined, and it also removes itself from the document after that. When we return just Turbo Streams from a controller, we tell Turbo to automatically apply them without touching the current document with Turbo Drive or Turbo Frames. That's why we need to do the Content Negotiation using the `$request->wantsTurboStream()`, as well as why we return them using the helpers provided by the Turbo Laravel package (either the `turbo_stream()` function or the `turbo_stream_view()` one). When using the helpers, Turbo Larave will add the correct Content-Type to the HTTP response.
The important part is that our flash message is back!
Since we're going with the Turbo Frame approach, we must also update the link inside our `articles._article_card` partial to add a `[data-turbo-frame="_top"]` attribute. This way, when the user navigates to the `articles.show` page using that link, it will tell Turbo that it should do a full navigation instead of trying to update just the `turbo-frame#articles`, since the link is now inside a Turbo frame.
With this approach, all our Turbo logic is self-contained in our views. Think about it: our controllers are plain Laravel controllers. There's nothing Turbo-specific in our backend code. Everything Turbo-related lives in our Blade views. How cool is that?
One more thing... you may have noticed that we haven't written any JavaScript for our bulk operations feature yet. Isn't that great? I think so, too. Now that we have our feature working with HTML let's improve our UX with some JavaScript sprinkles.
Sprinkling JavaScript
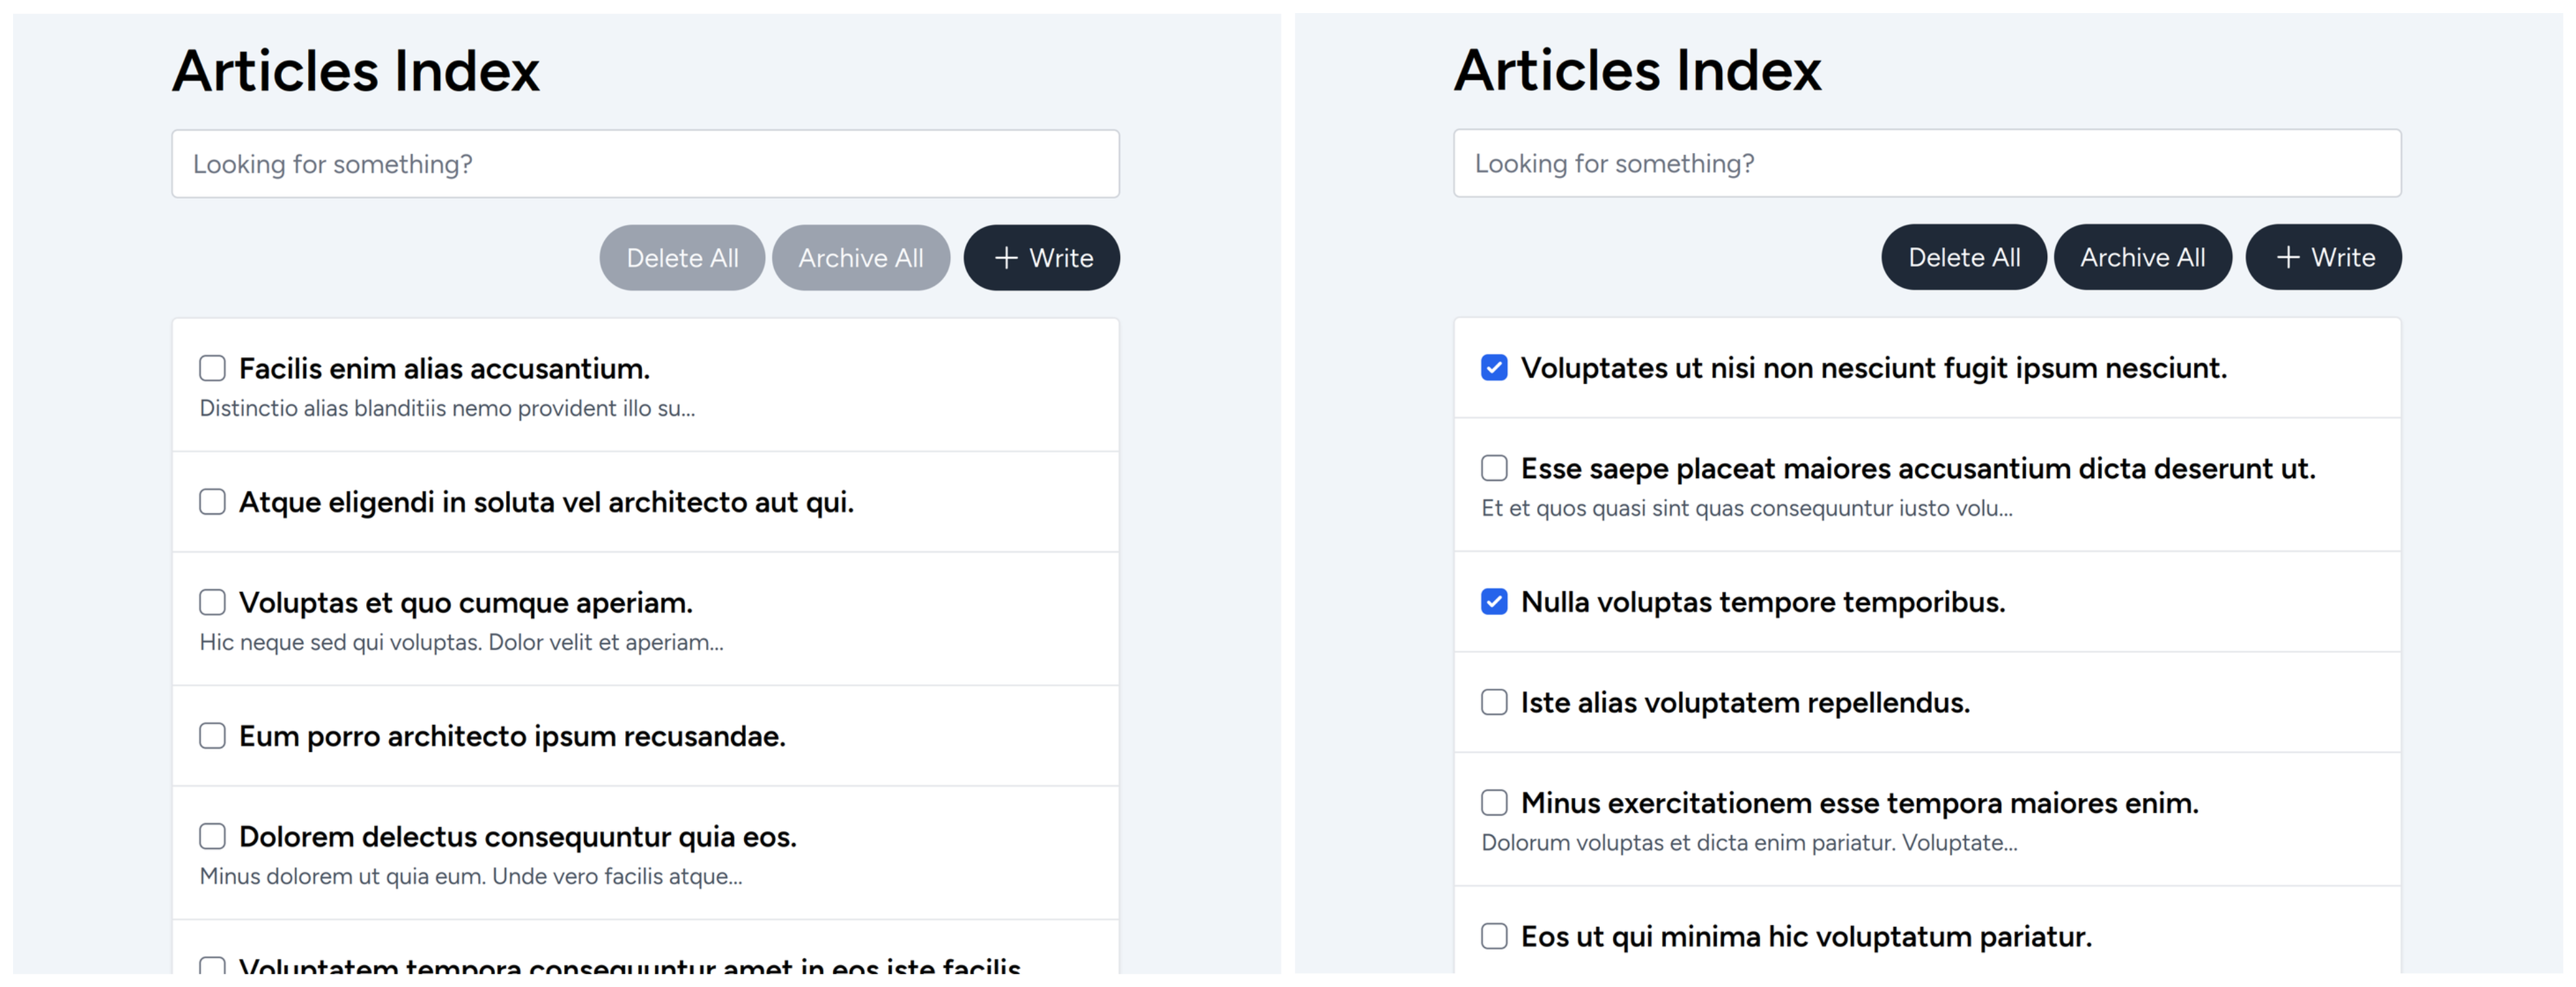
To get started, let's disable the buttons when we don't have any input checked. We'll need a Stimulus controller, and since I don't have a build system (nor import maps) in this application, I'm adding the Stimulus controller inline in the head tag of our main `app.blade.php` layout. We'll create a Stimulus controller called "bulk-form". This controller will need two targets: one for the form named `form` and another for the checkbox inputs named `input`. We'll also need an `update` action in our Stimulus controller that will be hooked into the `change` event of our checkbox inputs to toggle the submit buttons. This is what our Stimulus controller will look like:
We're also hooking into the `inputTargetDisconnected` callback because our articles will get removed from the UI (either using Turbo Streams or inside the Turbo Frame tag and, in this last case, our form is not inside that Turbo Frame so that it won't be "updated"). Stimulus is not reactive, but we can use the target callbacks to execute some code whenever a new target is connected, or an existing one is disconnected from the controller. In our case, we call the `bulk-form#updateButtons` action to disable the buttons if no checkbox inputs are checked.
Now, we can update our `articles.index` view to use the `bulk-form` controller:
Notice that we're binding the Stimulus controller to the app layout, which means we're binding the Stimulus controller to a `<main>` tag that surrounds the entire page. The controller must be bound to an element surrounding the form and the inputs. Our view doesn't have such an element, so we're binding the controller to the layout instead. We could also have added a new `<div>` to serve that purpose, but I prefer this approach. Less unnecessary elements are involved.
Next, we also need to bind our checkbox inputs to the `bulk-form` controller and call the `update` action whenever the state of the checkbox changes. Our checkbox input inside the `articles._article_card` partial will look like this:
We're not specifying the event in the `[data-action]` attribute, that is a feature called "Event Shorthand" in Stimulus, and it means we'll use the default event for the checkbox element, which in this case is the "input" event.
With our "bulk-form" Stimulus controller connected, our UI should look like this:
Shift Select
Apps like Gmail popularized a UI pattern for bulk operations called "Shift Select." If you check one element, skip a few, and check another while holding the "Shift" key, all elements between the previously selected one and the current one will also be checked.
It's tricky, but it's not that complicated. Let's implement it in our example. We'll need a new method to track when the user presses and releases the Shift key. That's mainly because we're using the `input` event to call the `bulk-form#update` action, and with that event, we don't have quick access to whether or not the user is pressing the Shift key since our input is of type "checkbox." We'd have access to it if we were on a text field or listening to other events, like click. But we should try to stick to the default input events as much as possible so that we don't have to rework our browser accessibility defaults that much later on.
Let's add a new action to our Stimulus controller called `toggleShiftKey` that will get called whenever the user presses the Shift key (on `keydown`) and also when they release the Shift key (on `keyup`). We'll assign an instance variable to our controller that will hold a boolean to signal whether the user is pressing the Shift key. Then, we'll update our `bulk-form#update` to add the new shift select functionality. Here's our Stimulus controller:
Stimulus.register("bulk-form",classextendsController{statictargets=["form","input"]isPressingShiftKey=falsepreviouslyChecked=nullconnect(){this.updateButtons()}update({target}){this.updateButtons()if(target.checked){if(this.isPressingShiftKey&&this.previouslyChecked){this.shiftSelect(target,this.previouslyChecked)}this.previouslyChecked=target}}toggleShiftKey({key,shiftKey}){if(key==="Shift"){this.isPressingShiftKey=Boolean(shiftKey)}}// privateshiftSelect(current,previous){letstart=this.inputTargets.findIndex(input=>input===current)letend=this.inputTargets.findIndex(input=>input===previous)// Previous input was probably removed from the DOM...if(end===-1)returnthis.inputTargets.slice(Math.min(start,end),Math.max(start,end)).forEach(input=>input.checked=true)}// ...})
Now, let's update our `articles.index` view to listen to the `keydown` and `keyup` events with the `@window` modifier to call the `bulk-form#toggleShiftKey` action. We'll bind the events next to the `data-controller` definition in our `<x-app-layout>` element:
And that's all we need. You can now use the Shift Select pattern in our bulk form! It works forward and backward! How cool is that?!
Quick Navigation With Arrow Keys
Let's add two more actions to our Stimulus controller to ease the keyboard navigation when we're focused on the checkbox inputs, and we want to quickly move focus to the next or previous checkbox inputs using the arrow keys. We'll call those actions `focusNext` and `focusPrevious`:
With that, we can quickly move to the next or previous checkbox input using the up or down arrow keys when focused on the input. Plus, our Shift Select behavior still works even when using the keyboard! Try it yourself: focus on any of the inputs, then mark it as checked by hitting the Space key, then move around using your up and down arrow keys to skip a few inputs, and then mark another one as checked by hitting the Space key while holding the Shift key. It works! That's the power of sticking to the default browser events as much as possible. Here's the full implementation of the Stimulus controller.
The HEY application inspired these Shift+Select and Arrow Navigation sections. I got the Shift+Select implemented before looking at their source code and noticed I had built it pretty much the same way, but I updated the example to match how they name things. Their code heavily inspired the Arrow Navigation example. I'm so glad we can view their source. Thank you to the HEY team for that!
I hope you learned some tricks with this tutorial. This UI is not feature-complete. We'd need to improve our accessibility by providing some hints to screen readers. But, to be honest, I don't know ARIA attributes that much yet, so I still need to research that front.
I'm using TailwindCSS, but I stripped out the classes in the examples here for brevity.
I hope you enjoyed the ride. I'll see you next time!